Rising from the dead.......with the magnum opus of DIY short shifters.
One.....two....three....four.....
Four months is quite a hiatus but never the less my university stuff is done and I can finally enjoy my summer holiday.
Recently I got the idea to make a short shifter for my '96 SAAB 900 ( 2nd gen ).
At first I did what anyone would do and went to the Internet to see who has done what, and since I'm very budget minded I only looked for DIY mods.
I did find a good one where a tube was used to raise the plastic bushing off the shifter housing and also sliding the pivot ball up the gear lever by however much you raised the plastic bushing.
To me this looked like a great idea and I immediately went looking for a suitable tube. That's where I was met by the first hurdle. I couldn't find a tube of suitable size. I did, however, have a sheet of 2mm stainless steel. The idea was to make a tube out of the stainless steel and then proceed as usual.
The problem I came into was that rolling the tube was not that easy, making the ends meet and have a nice, round bend was not doable in my garage. And thus I was back at square one.
That's when I had the great idea to just wing it and see what happens, and wing it I did.
I started out by cutting out the part of the housing that holds the plastic bushing in place.


Once I had removed the piece of the housing I roughly measured out and cut out a piece of the 2mm stainless sheet steel. Then I started drilling holes on the steel plate and in the aluminum housing for bolts. At first I thought about using M6 bolts with nuts but then I found some stubby little M6 self tapping bolts and decided that the aluminum was thick enough to be threaded. The threads made by the self tapping bolt were pretty tight, which was good knowing that I'll be using 100% of the thread and will be able to get the most out of the thin aluminum. With calipers I measured and made the cut out aluminum piece to be raised by 20mm.


At first I thought about making the ball joint thread into the shaft but then I decided to just drill a 5mm hole right through and secure everything with a M5 bold and nut.
Then I found a 8mm shaft that I took from an inkjet printer a long time ago, this shaft turned out to be a very nice fit in the ball of the smaller ball joint. The close fit is very important because the ball will also be used as a bushing for the shaft, which will be sliding up and down.
 The smaller ball joint was then mounted inside the shifter housing in a spot where it would be pivoting slightly lower than the factory gear lever. The thread was shortened and a long M8 nut was used along with a M8 bolt to hold the ball joint in place.


Four months is quite a hiatus but never the less my university stuff is done and I can finally enjoy my summer holiday.
Recently I got the idea to make a short shifter for my '96 SAAB 900 ( 2nd gen ).
At first I did what anyone would do and went to the Internet to see who has done what, and since I'm very budget minded I only looked for DIY mods.
I did find a good one where a tube was used to raise the plastic bushing off the shifter housing and also sliding the pivot ball up the gear lever by however much you raised the plastic bushing.
To me this looked like a great idea and I immediately went looking for a suitable tube. That's where I was met by the first hurdle. I couldn't find a tube of suitable size. I did, however, have a sheet of 2mm stainless steel. The idea was to make a tube out of the stainless steel and then proceed as usual.
The problem I came into was that rolling the tube was not that easy, making the ends meet and have a nice, round bend was not doable in my garage. And thus I was back at square one.
That's when I had the great idea to just wing it and see what happens, and wing it I did.
I started out by cutting out the part of the housing that holds the plastic bushing in place.


I then went around and drilled/tapped holed for a few more screws. After that I, again, roughly cut out a piece of stainless steel and secured in on the opposite side of the housing by drilling, tapping and bolting the stainless plate on.

At this point the structure was very stiff and I decided that I don't need to add any more steel.
Then came the gear lever, I didn't get any pics of that but I'll explain what I did. On the gear lever there's this black ball bushing thingy, in my case it was held in place by two C clips on top and bottom of the ball. The C clips were retained in place by grooves that were cut out in the shaft of the gear lever, which is actually a hollow tube.
What I did was I took the C clips off and the black ball long with them, I then measured out and cut two grooves around the gear lever shaft 20mm above the old ones. I then assembled the gear lever back together, this time securing the ball 20mm higher that before.
This way the pivoting point is raised and less movement on top is required to move the bottom part. After this I was nearly done, one little thing left to do was to shorten the plastic tube, which goes on the hear lever shaft and prevents you from shifting into reverse unless you raise that plastic tube up. Shortening the tube was rather straight forward, I cut it apart and removed roughly 20mm, I then took some large clear tubing that I found in the basement and secured everything together with hose clamps.
Pro tip: if you don't have a hose clamp big enough you can join two smaller ones.
That's what I did and the whole thing turned out looking pretty ugly but that's not a problem since everything is covered by the leather cover.

After this I was done modding and got to assembling. It didn't take too long to assemble the gear lever assembly and put it back in place.
Giving it a test I can tell that the gear lever has noticeably less travel and feels a bit stiffer, but that's to be expected. One thing that I didn't expect was the fact that I could no longer get into first and second gear.
Giving the situation some thought it became clear that this mod was not going to work. The thing is that in these cars when you move the gear lever around it not only moves the the shift rod around but also turns it. Turn the shift rod counter-clockwise and you can get into first/second, turn it clockwise and you can get into fifth/reverse. Since my gear lever now effectively has a larger turning circle it can no longer rotate the shift rod enough to shift into first and second gear.
Because of this I was pretty bummed out, but I was also.....brimming with ideas...heh heh heh
One of those ideas stood out more than others, it stood out so much, in fact, that I chose it as my next approach.
The plan was simple, I would replace the bushing in the shift rod with a ball joint to make it move the shift rod around without rotating it, then I could make something rotate the shift rod as it was moved from side to side, and this rotation would be enough to allow me to shift into all gears.
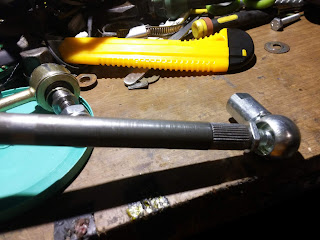
And with the plan in mind I went looking around my local hardware store. I quickly found what I needed, that being two ball joints.


The top one was going to be used to replace the bushing in the shift rod to allow the shift rod to rotate independently and the bottom one I chose for a very particular purpose and the fact that it's open on both ends is quite important in my case.
The closed ball joint is bigger than the open one, it has a M10 thread on the ball and M8 thread on the socket, while the open one is smaller in size but also has an M8 thread and a 8mm hole in the ball. The M10 thread on the bigger ball joint is a close fit in the hollow gear lever.

Then I found a 8mm shaft that I took from an inkjet printer a long time ago, this shaft turned out to be a very nice fit in the ball of the smaller ball joint. The close fit is very important because the ball will also be used as a bushing for the shaft, which will be sliding up and down.


After that I started modifying the shift rod by taking a big old 14mm drill and making a gole in the end of it.

This hole turned out to be the same as the inner diameter of the tube that the shift rod was made of and was also a snug fit for the end of the bigger ball joint.

Next I drilled a ~14mm hole through the side of the shift rod.

I then took the metal tube from the bushing that was in the bottom part of the gear lever and welded it in. No pic of that but you don't need to see my ugly welds.
After that I started making the fork/bracket/sliding thingy that was responsible for rotating the shift rod. For that I cut apart a piece of square cross section tubing and bent it into a U shape.

I then drilled a 8mm hole in the top and two 8mm holes in the sides. A piece of the 8mm shaft was cut off and held in the middle hole by a slight press fit.

The piece of shaft was then welded in, the weld was cleaned up and the whole thing was slightly shortened. The end result was the finished part.

And just like that the fabricating was done and all that was left to do was to assemble the shifter housing assembly. You can see that the bigger ball joint is held in the shift rod by a M6 bolt.

At this point you may be able to see how the shifter works. If not, allow me to explain. As the gear lever moves around it pushes the shift rod side to side, but it can't rotate it. That's where the smaller ball joint comes into play. The way this is assembled forces the shift rod to rotate around the radius of a predetermined circle, thus turning the shift rod more than the old shifter could. Since the turning radius of the effective circle is smaller than the radius of the gear lever it also has to move closed and further from the ball joint, which is why it was important that the ball joint had a hole through it to allow the 8mm shaft that is welded to the U piece to slide in and out, otherwise the whole assembly would have bound up.

I then assembled the reverse gear locking mechanism back into the housing and the job was finished.
Now the moment had come to install the shifter assembly back into my car and test how it works. Putting it in was quite straight forward, of course due the complexity of the assembly I had to first connect the shift rod to the shifter assembly and install everything along with it.
After I put everything in place, I connected the shift rod to my gearbox and tightened it in place.
First test revealed that my modification was successful and I could easily get into all the gears without problems. After that all that was left to do was to adjust the gear lever and shift rod position so that shifting gears felt just right and I was done with what I'd dare call the most elaborate DIY short shifter anyone has ever done.
That's all for now, thanks for stopping by.


Komentarai
Rašyti komentarą