Pranešimai

Rodomi įrašai nuo gruodis, 2017

Making a quick and dirty adjustable PSU.

Vaizdas
An adjustable PSU is easily one of the most important pieces of equipment in any electronics related workshop. It just so happens that I don't have a functional PSU and without one not much is possible. So I sat down at my messy workbench and decided to take a crappy old adjustable PSU that I had made long ago and improve it by quite a margin. The crappy little PSU consists of a small linear transformer arrangement from a TV where it served as a stand-by power supply, I just added a LM317T to it. The PSU was crappy because it could only output very low current, 200mA max if I remember right. To put that into perspective it could barely just about blow up an LED, that's how weak it was. This "feature", let's call it, was often used for charging lithium batteries. Of course I need more power and I need it now so I gathered some scraps from other failed projects to upgrade the crappy PSU at hand. I had a laptop power brick that I modified to work at 24V that I would ...
Converting a power steering pump into a vacuum pump - the opening.

Vaizdas
I've always wanted a high vacuum setup but Santa didn't leave one under my Xmas tree so I'll have to, you guessed it, DIY my own.  One of the easiest ways to obtain vacuum is with a refrigerator compressor. While refrigerator compressors do achieve some level of vacuum it's not real vacuum. The reason is that refrigerator compressors use pressure controlled valves that require pressure difference to keep them shut. In true vacuum the air molecules are no longer making contact with each other so you can no longer achieve a pressure differential, thus the reed valves in your fridge compressor no longer close and only a certain level of vacuum can be achieved. That's assuming your fridge compressor doesn't stop pumping even earlier than that. If the valves were to be controlled mechanically then a higher lever of vacuum could be achieved. One of the most popular types of vacuum pumps is a rotary vane pump. These have vanes that work as valves and since they're...

Bending tubes without a tube bender

Vaizdas
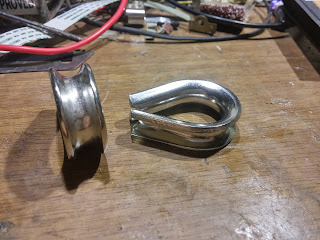
Heatpipes are rarely straight, that's why I had to find a way to bend my brass tubes. Bending a tube is not hard, you just put it over your knee and voila. Of course that would also put a huge kink in the tube and it could no longer be used for a heatpipe. The corners in a heatpipe need a nice curve because when the working fluid vaporizes it has to travel along the tube with minimal restriction, kinks and sharp corners are not good. To make nice bends in tube you need a tube bender. I did not have a tube bender and they're not available locally, buying one online would take ages to ship, especially considering it's xmas season. My only option was to DIY a tube bender, which is exactly what I did. I started out by going to my local hardware store and buying myself a pulley block and steel thimbles. My plan was to use these as my dies to bend my tube around. My first try was with the steel thimble since it was easy to clamp the tube to it. In order to not waste any ...

Links to the interesting projects/blogs of others. [Updated 2020-03-12]

I tend to change computers a lot so I thought I'd get two birds with one stone by posting the links to cool projects done by others here. This way I won't lose my links whenever I change out my computer and you can also have something to read. [I'll keep adding links to this list as I find them] https://simplifier.neocities.org/index.html http://www.teralab.org/index.htm http://ecorenovator.org/forum/conservation/891-diy-ventilation-heat-exchanger-18.html#post18665 http://lordsqueak.blogspot.lt/2009/08/homecooked-diy-heatpipes.html http://www.mikesflightdeck.com/instruments/diy_aircore_instruments.html http://www.sparkbangbuzz.com/ http://tesladownunder.com/index.html 2020-03-12 update: https://kronoshacker.blogspot.com/ https://halestrom.net/darksleep/ https://charleslabs.fr/en/projectlist http://www.155la3.ru/k224_2.htm https://eecaldas.wordpress.com/ http://vu2ppp.com/home https://www.tinaja.com/whtnu20.shtml https://kaizerpowerelectronics.dk/ http://www.hpfriedr...

DIY analog ammeter/voltmeter from scratch.

Vaizdas
I thought it would be fun to make myself an analog meter. For that I gathered some scrap from around the bench and went at it. The construction of my meter would be basically the same as it is in modern analog meters with a cylindrical magnet in the center, the coil assembly around it and some metal around to help strengthen the magnetic field. For my materials I used some sheet metal from the enclosure of a floppy drive, some very thin copper wire, super glue, hot glue, metal shears, aluminum from a beer can, a bit of wooden dowel and a bit of thicker copper wire. I started out by cutting a notch in the center of my wooden dowel. I used this to make my center cylinder magnet. I decided to try make mine an electromagnet but a permanent magnet can also be used. The armature for my electromagnet turned out great, except for one thing, winding my copper wire around this was quite bothersome so I quickly came up with dowel version 2. I used this dowel to bend up my electro...

Quick thermocouple experiment.

Vaizdas
After today's experiment with wicks I've found the perfect wick for my next experiment, but before that I need to prepare some more things. For my next experiment I'll need to be able to accurately measure the temperature of my heatpipe at both the cold and hot end. Since I'm all about DIY I thought the best way to measure the temperature would be to make myself some thermocouples. One easy way to make a thermocouple would be to create a junction between iron and copper. I want the mass of my thermocouple to be very small but I didn't have any thin iron wire, which is why I went looking for alternatives. One of them being NiChrome wire. As long as the junction consistsd of two dissimilar metals I can create a thermocouple. Creating the junction can be tricky, but I had the perfect solution for that - the electroplating solution. Since I've read somewhere that adding borax to your copperplating solution will help in creating a more uniform copper layer I added so...

Heatpipe wick structures - a follow up.

Vaizdas
It's a new day and my electrolysis experiment has been going for quite a while now. Unfortunately it's not gonna work out as I hoped it would for the sole reason that it's too slow and achieving a uniform layer of copper crystals is not as easy a I had anticipated. Therefore I decided to look at the more conventional methods of creating wick structures as well as a few more interpretations of my own. For a my wick I need it to be easy to make out of materials readily available to me. Previous experiments indicate that I need my wick to be rather dense and very close to my tube surface in order to achieve best performance. I started out with some plain copper wire that I stripped and wound around a steel shaft. I tried to wind it as flat as possible and I also wound it in two layers, each winding going in the opposite direction. This was to decrease the possibility of it coming undone since I've had it happen to me before. This wick design showed signs of ethanol ...

Experimenting with various wick structures and some electrolysis.

Vaizdas
Without the wick structure the only thing to bring the condensed working fluid back to the hot end is gravity. Because of this the heatpipe would only be able to operate in a vertical or near vertical position with the heat source being at the bottom of the heat pipe. If you want your heatpipe to work horizontally you need to find other ways to pump the working fluid back to the hot end. The easiest and most popular way is to line the inner walls of your heatpipe with a wick. Through capillary action the fluid flows back to the hot end where it can evaporate again. This grants you the ability to position your heatpipe in almost any direction without major efficiency losses. I find myself to be quite intrigued by the wick structure and I spent today finding out various stuff about it. I started today with some electrolysis. My plan was to create a porous copper crystal structure on the inner surface of my brass tube through electrolysis. I went out to buy myself some copper sulfate an...