Don't have a body panel hammer? Make one! Here's how I made my DIY body panel hammer in 30 minutes.
A year ago I bought myself a classic car and this summer I finally found enough time to repair the rusted body panels. But as the problem with most classic cars is, there's no parts for sale and when they become available they cost a fortune. So hobbyists like me and many others alike have to DIY their own body panels. There are specialized tools for beating body panels and working sheet metal, such as the classic hammer and dolly which are the bread and butter of panel beating.
Up until now i've been using a regular hammer but it's old, it's square and it doesn't leave a nice finish. For hammering nails into wood it's been fine. Body work? Not so much. So I got tired of it and decided to make my own. Buying one is not possible because there are none for sale locally and it would go against my DIY nature. So let's make it!
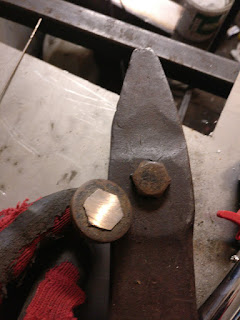
First I started off by scavenging for scrap steel. You can imagine the basic shape of the hammer as a disc stuck to a rod, that's then stuck to a tube that your wooden handle goes through. With this in mind you can go to your parts bins imagining how you could maybe use this piece for this or that piece for that until you have what you need for the hammer. In my case I looked thraight into my "big bolt" bucket and found a large flange bolt. I think that large bolts in general are great for a hammer like this since large bolts have large heads that can be ground into a hammer head, this makes it quicker and easier. I cut off the hex of the flange bolt with my angle grinder and with the help of a flap disk ground it flush, but not flat. Body panel hammers have a slight crown on them. Meaning the hammering surface has to be ever so slightly rounded, but not too much.

Now all that was left, to finish the hammer head, was to add a piece where a handle can be attached. For this I grabbed a piece of 20x4mm flatbar. What I want is an oval ring but rolling this flat bar into a ring would be very hard. So instead I cut two pieces off and bent them into a "C" shape, so that I could weld them together to form a ring. In the end these formed more of an elongated hex than an oval, which made fitting the handle later harder. I'd advise you find an appropriate size piece of thick wall tubing or pipe and just squash it in the vise. After I welded the pieces of bent flatbar together I tacked on my hammer head with the welder. I then placed the hammer head in the vise and bumped it around to properly align it. After I liked how it all looked I brought the hammer head to the welder and finished welding it up.

A hammer is not complete without a handle, which is what I made next, and in the spirit of using scrap material I pulled out a piece of old pallet wood. I liked the handle on my old hammer so I measured out a piece about the same size. I cut the wood out with my jigsaw. A flap disk on the angle grinder made quick work of the piece of wood, it also made quick work of turning everything around into a mess. If you decide to take the angle grinder approach make sure you make the mess away from where it shouldn't be. After some sanding with some sandpaper I had a rather nice looking handle. And since I used pallet wood there just has to be a nail hole in the handle.


This is where I came into a bit of a fitment issue with the hammer head. Since I made the handle shape into an oval it didn't really fit into the hex hole in the hammer head and resulted in some looseness. But it was not too much, just something to keep in mind for next time.

Now for a little trick. If you have a hammer with a loose hammer head, you can use a woodscrew with a wide head and screw it into the top of the hammer handle to spread the wood apart, tightening the hammer head in place. Just make sure you drill a pilot hole to prevent cracking the handle. This is also how I tightened the hammer head in my DIY hammer as well. The handle was sticking out of the top and the wood wood split apart, so cutting the splintered excess off finished the hammer and fixed up the look.

After taking the hammer out for a quick test I noticed that the center of the screw was not attached to the flange, so I had to weld it in place to keep it from moving. After I welded it in place I reground the surface with the angle grinder and the DIY hammer was good to go. A finishing touch was to hand sand the hammer surface with a piece of sand paper in the palm of my hand. This rounds off the edges of the surface, which prevents the hammer from gouging the surface of your panel if you hit at a bad angle.


Time for some final thoughts. Seems like if I hit something sharp and hard, like weld spatter, it does ever so slightly mark up the hammer surface, but nothing major. The bolt I used was too rusted to tell the marking but big bolts like these tend to be 10.9 grade or better. As for the function I am very pleased with how well this hammer performs. I was able to flatten out the many bumps in a custom panel I had made for the classic car I am fixing up and this really gave it the finishing touch it needed. If you hit hard enough you can move quite a lot of metal, but I think that would damage the surface of the hammer too much. Perhaps if the bolt/metal used for the hammer had enough carbon content to be hardened, maybe then you could really get this bad boy to hammer hard. For now I just sand the surface with a piece of sandpaper in the palm of my hand to shine it up and hammer away.
That's it for now, thanks for reading.
Up until now i've been using a regular hammer but it's old, it's square and it doesn't leave a nice finish. For hammering nails into wood it's been fine. Body work? Not so much. So I got tired of it and decided to make my own. Buying one is not possible because there are none for sale locally and it would go against my DIY nature. So let's make it!
First I started off by scavenging for scrap steel. You can imagine the basic shape of the hammer as a disc stuck to a rod, that's then stuck to a tube that your wooden handle goes through. With this in mind you can go to your parts bins imagining how you could maybe use this piece for this or that piece for that until you have what you need for the hammer. In my case I looked thraight into my "big bolt" bucket and found a large flange bolt. I think that large bolts in general are great for a hammer like this since large bolts have large heads that can be ground into a hammer head, this makes it quicker and easier. I cut off the hex of the flange bolt with my angle grinder and with the help of a flap disk ground it flush, but not flat. Body panel hammers have a slight crown on them. Meaning the hammering surface has to be ever so slightly rounded, but not too much.


Now all that was left, to finish the hammer head, was to add a piece where a handle can be attached. For this I grabbed a piece of 20x4mm flatbar. What I want is an oval ring but rolling this flat bar into a ring would be very hard. So instead I cut two pieces off and bent them into a "C" shape, so that I could weld them together to form a ring. In the end these formed more of an elongated hex than an oval, which made fitting the handle later harder. I'd advise you find an appropriate size piece of thick wall tubing or pipe and just squash it in the vise. After I welded the pieces of bent flatbar together I tacked on my hammer head with the welder. I then placed the hammer head in the vise and bumped it around to properly align it. After I liked how it all looked I brought the hammer head to the welder and finished welding it up.

A hammer is not complete without a handle, which is what I made next, and in the spirit of using scrap material I pulled out a piece of old pallet wood. I liked the handle on my old hammer so I measured out a piece about the same size. I cut the wood out with my jigsaw. A flap disk on the angle grinder made quick work of the piece of wood, it also made quick work of turning everything around into a mess. If you decide to take the angle grinder approach make sure you make the mess away from where it shouldn't be. After some sanding with some sandpaper I had a rather nice looking handle. And since I used pallet wood there just has to be a nail hole in the handle.


This is where I came into a bit of a fitment issue with the hammer head. Since I made the handle shape into an oval it didn't really fit into the hex hole in the hammer head and resulted in some looseness. But it was not too much, just something to keep in mind for next time.

Now for a little trick. If you have a hammer with a loose hammer head, you can use a woodscrew with a wide head and screw it into the top of the hammer handle to spread the wood apart, tightening the hammer head in place. Just make sure you drill a pilot hole to prevent cracking the handle. This is also how I tightened the hammer head in my DIY hammer as well. The handle was sticking out of the top and the wood wood split apart, so cutting the splintered excess off finished the hammer and fixed up the look.

After taking the hammer out for a quick test I noticed that the center of the screw was not attached to the flange, so I had to weld it in place to keep it from moving. After I welded it in place I reground the surface with the angle grinder and the DIY hammer was good to go. A finishing touch was to hand sand the hammer surface with a piece of sand paper in the palm of my hand. This rounds off the edges of the surface, which prevents the hammer from gouging the surface of your panel if you hit at a bad angle.


Time for some final thoughts. Seems like if I hit something sharp and hard, like weld spatter, it does ever so slightly mark up the hammer surface, but nothing major. The bolt I used was too rusted to tell the marking but big bolts like these tend to be 10.9 grade or better. As for the function I am very pleased with how well this hammer performs. I was able to flatten out the many bumps in a custom panel I had made for the classic car I am fixing up and this really gave it the finishing touch it needed. If you hit hard enough you can move quite a lot of metal, but I think that would damage the surface of the hammer too much. Perhaps if the bolt/metal used for the hammer had enough carbon content to be hardened, maybe then you could really get this bad boy to hammer hard. For now I just sand the surface with a piece of sandpaper in the palm of my hand to shine it up and hammer away.
That's it for now, thanks for reading.


Komentarai
Rašyti komentarą